CallClerk - Settings Database
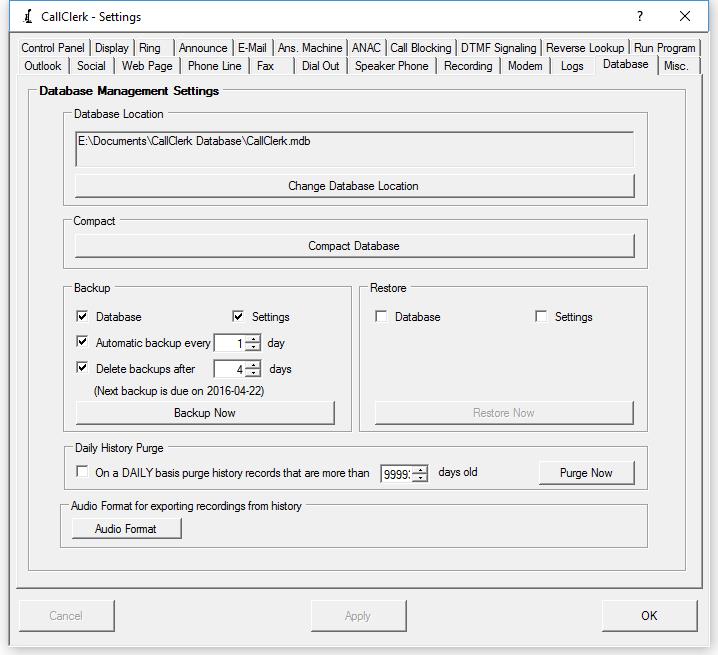
The CallClerk - Settings – Database window is used to set the location of the CallClerk Database; the CallClerk Database stores the CallClerk Directory and History entries. This setting window is also used to release hard disk space associcated with deleted and updated records.Changing the location of the CallClerk Database
You can find the location of the CallClerk Database by looking at the Database Location value at the top of the CallClerk - Settings - Database window; here is an example path and file name:
C:\Documents and Settings\All Users\Application Data\CallClerk\callclerk.mdb
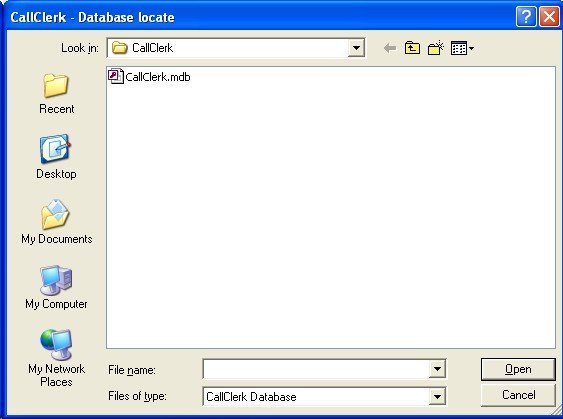
You may change the CallClerk Database location by clicking on [Change Database Location] button; this will open up the CallClerk – Database Relocate window (samples below).
The location of the CallClerk Database can only be changed to a directory in which a CallClerk Database exists.
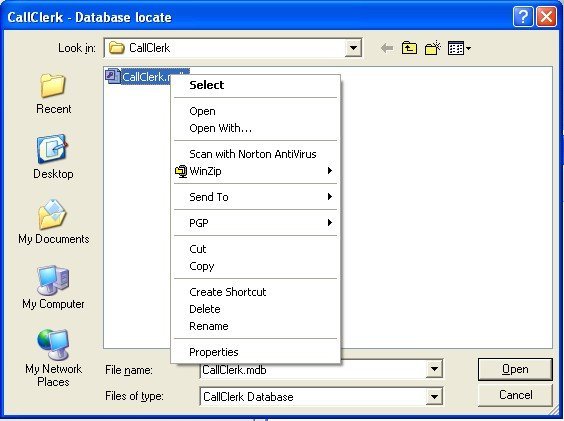
To copy, or move the CallClerk Database, as you are changing locations using the CallClerk – Database Relocate window:
1. click the right mouse button on the file ‘callclerk.mdb’ and select ‘copy’ or ‘move’ as appropriate in the original directory,
2. navigate to the your new desired location by changing the ‘Look in’ selection, and
3. click the right mouse button in the file area of the new desired location and select ‘paste’.
If you move the CallClerk Database without updating its’ location in the CallClerk – Settings – Database window a warning message will appear at startup time.
Compacting the Database
As entries are updated or deleted in the CallClerk Database additional disk space becomes available for return to the system. Clicking the [Compact Now] button compresses the CallClerk database and returns any space no longer needed.
Backing-up and Restoring the CallClerk Database and Preferences file
Backup
To backup either the CallClerk database, preference file or both,
1. click on the check box of the files you would like to backup
2. click on the [Backup] button
The CallClerk Database will be compacted prior to it being backed-up.
You can also select to have the Database and/or Settings backed up automatically on a periodic basis. If the option to run an automatic back up is selected CallClerk will automatically run a backup to the frequency you select. Backups will be run when due, soon after you start CallClerk, or if you leave CallClerk running past midnight at approximately five minutes past midnight. Backup times may be delayed if CallClerk is busy doing other things, such as processing an incoming call, at the time the backup is scheduled to be run.
Restore
To restore either the CallClerk database, preference file or both,
1. click on the check box of the files you would like to restore
2. click on the [Restore] button You will be prompted to select for the location and filename of the previously backed-up file(s). Once selected click 'OK'.
You can have CallClerk automatically delete history entry that are over a certain number of days old. CallClerk will automatically run a database purge soon after you start it or if you leave CallClerk running past midnight at approximately five minutes past midnight. Purge times may be delayed if CallClerk is busy doing other things, such as processing an incoming call, at the time the backup is scheduled to be run.
After a database purge has been run, CallClerk will compact your database.
IMPORTANT NOTES
History entries are purged/deleted based on the day they are created and the current date.
CallClerk bases the date a History entry is created and the current date on your PC's system clock.
Accordingly, if sometime in the future you advance or back date your PC's clock date, for what ever reason, you should be aware that CallClerk's purge/delete functionality may end up deleting entries you may had not intended to delete.
For example:
If you set your PC's system date ahead one year, and have CallClerk set to delete all records over 90 days old, you may inadvertently end up deleting all your history records.
If a History entry has a message or fax associated with it, the message or fax will be deleted too.
Once a history entry is purged/deleted CallClerk can not restore it nor its associated message or fax.
Audio Format
Click the Audio Format to set the audio format messages will be saved in from the CallClerk - History window. For more information on Audio Formats please see Setting the Audio Format.
Once the current settings have been modified the changes may be permanently applied by clicking on the [Apply] or [OK] button or voided by clicking on the [Cancel] button. If either the [OK] or [Cancel] button is pressed then the CallClerk – Settings window will be hidden.
Here is what the CallClerk – Settings - Database window looks like:

Here is what the CallClerk - Database Relocate window looks like:

Here is what the CallClerk - Database Relocate window looks like after right clicking on the callclerk.mdb file:
